The Colormap Editor is a window that enables you to map colors to specified data values, the results of which are displayed in the visual image. In addition to color, the Colormap Editor also controls the mapping of opacity to data, which is the degree of the image's transparency in relation to its background. Maximum opacity shows the color calculated by the hue, saturation, and value fields; minimum opacity calculates colors so that the image is faintly visible in front of the background. In summary, the Colormap Editor enables you to:
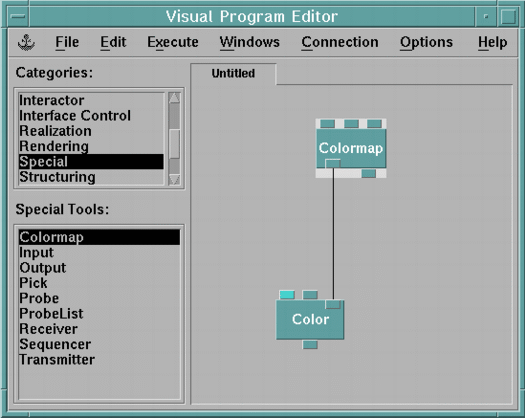
Figure 56. Fragment of
Visual Program Using Colormap
To use the Colormap Editor:
| Note: | From the VPE, this option is Open Colormap Editor. For this option to be available, the Colormap icon must be selected. |
Figure 57 illustrates the organization of the Colormap Editor window.
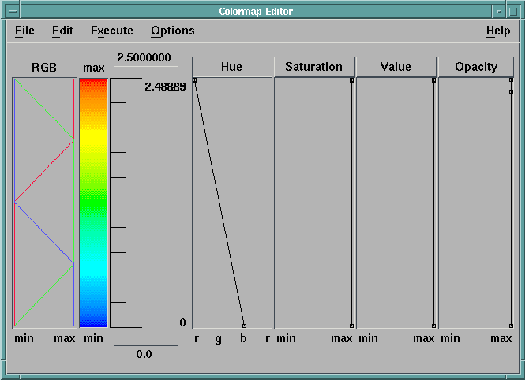
The Colormap Editor specifies color in the hue, saturation, and value (HSV) color space. Hue refers to the color, for example, blue, red or yellow. The range of the hue goes from red to green to blue back to red again. Saturation refers to the purity of the color, and is a value between 0 and 1. A saturation of 1 is pure color; as saturation decreases, the color becomes more pastel, becoming white when saturation is 0. Value is the brightness of the color, and is a value between 0 to 1. A value of 1 is maximum brightness; as value decreases, the color becomes darker, becoming black when value is 0.
For a thorough understanding of color and the color elements of hue, saturation, value, and opacity, and other elements of computer graphics that might relate to the Colormap characteristics, you may want to refer to a computer graphics text.
You can display the Colormap Editor by selecting the Open All Colormap Editors option on the Windows menu of the Image window or by double-clicking on the Colormap tool in the VPE window. The Colormap Editor displays default settings for each of the three HSV color space parameters, as shown in the first three boxed areas on the right hand side of the window. These three areas, labeled Hue, Saturation, and Value, each work independently of one another. As you change their values, the RGB boxed area at the left of the window changes automatically to correspond.
The Opacity area, located on the far right hand side of the Colormap Editor window, works in a similar way. As you make changes in the opacity area, the background bar (located to the right of the RGB bar) reflects your work. It shows your adjustments to the opacity of the image in relation to the background colors. By default, the background bar appears as two vertical stripes. However, if it is easier for you to judge the colors of the image and background with a checkerboard-style bar, select the Set Background Style to Checkboard option on the Options menu (see "Colormap Options Menu").
In order to perform certain operations on an area, it must be selected. To select an area either click on the area's label or click in the area itself. Only one area can be selected at a time. When an area is selected, its label is depressed.
The range of data values onto which HSV and opacity values are mapped is controlled by the min and max fields located near the bottom and top of the Colormap Editor window. By default, min is set to 0, and max is set to 100. You can change this range to values more appropriate for your data by clicking on either field, typing the new value, and pressing the Enter key.
Control points are used to define the value of hue, saturation, value, and opacity for a given data value. The number and position of control points can be different in each of the areas. The control points appear as small squares on the vertical scale marks in each of the four areas.
Control points can be added to an area using one of four different methods:
To add a new control point by double-clicking, place the cursor on the location where you want the new control point, then double-click. The values between control points are linearly interpolated by the Colormap. If a new point is added as the bottom- or top-most point on the line, the new line continues vertically from the new point to the min or max value, respectively. When a new control point is added, its data value is displayed by default.
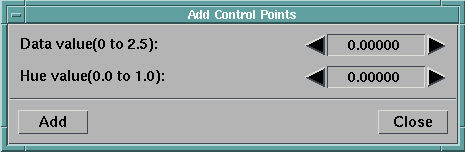
To specify exact values for new control points, click on the Add Control Points... option on the Edit menu. The Add Control Points dialog box appears, as illustrated in Figure 58. The Add Control Points... dialog allows you to specify values using two steppers. The "Data value" stepper allows you to specify a control point value between "min" and "max". The second stepper displayed in the dialog will reflect that area (Hue, Saturation, Value, or Opacity) is currently selected in the Colormap Editor. For example, if Saturation is the selected area, the dialog will display steppers for "Data value" and "Saturation value". The value for Hue, Saturation, Value, or Opacity can be a value between 0 and 1. Use the Add button to add the control points to the selected area in the Colormap Editor.
Figure 58.
Colormap's Add Control Points Dialog Box
Control points can be selected by doing one of the following:
| Note: | A control point is selected automatically when it is created. When one control point is created, all other previously selected points in that area are automatically deselected. |
To delete selected control points, you can do one of the following:
To move a control point, simply drag it to the desired location. Control points cannot be moved past each other; this facilitates the creation of step functions. They can be moved as a group by doing the following:
The movement of control points can be constrained either horizontally or vertically by selecting the Constrain Horizontal or Constrain Vertical option from the Colormap Edit menu (see "Colormap Edit Menu"). By constraining horizontally after adding a precise control point, you can move the point to change the color or opacity mapped to specific value, without changing the value itself.
To create waveforms, select the Generate Waveforms option from the Edit pull-down menu. The Generate Waveforms dialog box appears (Figure 59).
Figure 59. Generate
Waveforms Dialog Box

This dialog box allows you to:
Control points can be copied and pasted from one Colormap area to another, using the Copy and Paste options of the Edit window.
The data values of control points are displayed by default. You can control which data values are displayed, using the Display Control Point Data Value cascade menu in the Options menu. If "off" is specified, no data values are shown. If "selected" is chosen, only the data values for the selected control points are shown, and if "all" is selected, the data values for all control points in the selected area are shown.
You can control how the Colormap Editor axis is displayed by using the Options menu Axis Display... option. You have three choices for the display: Ticks (the default), Histogram, and Log Histogram. Histogram will cause the histogram of the data to be displayed. Log Histogram will cause the log of the histogram to be displayed. If the Colormap Editor is not data-driven, these two options will be grayed-out. The number of histogram bins can be controlled using the Edit menu Number of histogram bins... option.
Every Colormap Editor is given the default name of "Colormap Editor" in the box across the top of the window. If you want to customize the name of the Colormap Editor, you can do so by clicking on the Options menu Change Colormap Name... option and entering a new name in the dialog box that appears.
Note: You can also change the name of the Colormap Editor by using the title parameter in the Colormap tool.
You can save a color map by using the Save As... command from the File pull-down menu). You can then make the "new" color map part of any visual program. To access it, use the Open command from the File pull-down menu of the Colormap Editor menu bar. Note that saved color maps may also be imported (see Import in IBM Visualization Data Explorer User's Reference) and passed directly to the Color module.
The Colormap Editor may be data-driven, meaning that its attributes (e.g., minimum and maximum) can be set by connecting the output of a tool to the input of the Colormap tool in the VPE or by typing a value into the Colormap configuration dialog box, instead of into the Colormap Editor itself.
If the Colormap Editor is data-driven, the information transmitted via the connections or set in the Configuration dialog box overrides values set in the Colormap Editor.
Data-driven Colormap Editors allow you to create color maps that are appropriate for a variety of input data sets without the need to reset the minimum and maximum of the color map.
The Colormap tool has a data input to which an input data field may be connected. In this case, the Colormap Editor is automatically set so that the minimum is the minimum of the data set and the maximum is the maximum of the data set. However, if you would like to have more control over the exact values that are used, the Colormap tool allows you to specify the minimum and maximum directly through other input tabs that are by default hidden. You can also pass a color map or opacity map directly to the Colormap tool. The inputs for the Colormap tool are summarized in the corresponding module description in IBM Visualization Data Explorer User's Reference.
Each time an input to a data-driven Colormap Editor is changed (e.g., by importing a new data set), the interactor is reexecuted, updating its attributes.
![]()
![]()
![]()
![]()
[ OpenDX Home at IBM | OpenDX.org ]