After you set up a visual program in the VPE window and build any desired Control Panels (or after you open an existing visual program file), you can execute the visual program program. The resulting image appears in the Image window. This section explains how to execute a visual program. Section 6.1 , "Using the Image Window" describes how to manipulate images in the Image window by using direct interactors. You can also manipulate images in the Image window using interactors in the Control Panels, the Colormap Editor, and the Sequencer. (For more information on these tools, see 7.1 , "Using Control Panels and Interactors", Colormap, and Sequencer in IBM Visualization Data Explorer User's Reference.)
You can execute the visual program from the Execute menu of a VPE window, a Control Panel, an Image window, or a Message window. The options are the same in all four windows. When a visual program is executed, an Image window is created if one is not already open. (You can also control execution using the Execute module. See IBM Visualization Data Explorer User's Reference.)
| Note: | If the Execute options are grayed-out, your workstation may not be connected to the server. For information about connecting to the server, see 9.3 , "Connecting to the Server". |
You can choose one of four options from the Execute menu when executing a visual program. Select the first option, Execute Once, to execute the program once, using the values currently set in the interactors. If you change any interactor values after execution, the visual program does not automatically execute; you must again choose an option from the Execute menu to execute the altered program.
Choosing the Execute on Change option causes the visual program to execute every time you change an interactor setting. If you change values faster than Data Explorer can generate images, the system executes the program as quickly as possible, always using the current settings at the time an execution cycle begins. If you modify your visual program while Execute on Change is enabled, then the option automatically becomes disabled. After the changes are made, you can reenable it.
Choosing End Execution while the visual program is executing causes execution to stop after the currently executing module.
The final Execute menu option is Sequencer. If you select this option, and a Sequencer tool is present in the visual program, the Sequencer appears (see "Using the Sequencer" for more information). While the Sequencer runs, you can change interactor settings, and those changes are reflected in subsequent frames generated by the Sequencer. The Execute Once and Execute on Change options are grayed out when the Sequencer is running, but when you pause the Sequencer, you can use those two options to explore the particular frame the Sequencer paused on.
While the visual program is executing, the Execute option on the menu bar is highlighted. It remains highlighted until execution is finished. If Execute on Change is selected, the Execute option on the menu bar is highlighted with one color during execution, and another color outside of execution cycles.
The Sequencer allows you to "animate" a visual image and is very easy to use. The process is rather like running a video cassette tape: You can play it forward or backward, stop it, pause, and so on. The Sequencer Control panel consists of 8 buttons as shown in Figure 33.
Figure 33. Sequence
Control Panel. The first two buttons at top left are Loop and
Palindrome. The others are: Step (<||>), Counter
(...), Back (<), Forward (>), Stop (&sqbul;),
and Pause (||).
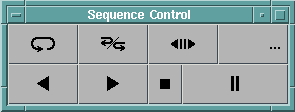
The > button starts the animation sequence and plays forward. The < button plays the sequence in the opposite direction.
The &sqbul; button stops the animation and resets the animation to the beginning of the sequence, while the || button pauses the animation at the current frame.
The Loop button causes the animation to loop; that is to go from beginning to end, reset to beginning, play to end, and so on until terminated by either pause or stop.
The Palindrome button causes the sequence to be played from beginning to end, and then from end to beginning.
Loop and Palindrome can be pressed simultaneously, resulting in an continuous forward and reverse animation.
The <||> button causes the behavior of the > and < buttons to become single-step mode. Each time one of these buttons is pressed, the animation advances one frame in the specified direction.
The ... button opens the Frame Control dialog. The Frame Control dialog box (see Figure 34) is used to specify the first, "next," and last (end) frames, the number of frames, and the increment between successive frames.
If a frame is being displayed, the current frame number appears in the Frame Control dialog box, next to the word "Current," and a corresponding colored marker is shown on the slide bar. A colored marker indicating the position of the next frame is also shown. Black markers indicate the positions of start and end relative to the next range of min to max.
Figure 34. Sequencer
Frame Control Dialog Box

Start | The starting value for the sequence. By default, set to the value in the Min field, in a new program. To change the Start field, use the stepper controls or select the field and enter the new value or use the Start marker. If you change the value in the Min field, then the Start field is set to that new value. If you are working with a saved program, then the Min and Start fields are set to the values that were saved. |
End | The ending value for the sequence. By default, set to the value in the Max field, in a new program. To change the End field, use the stepper controls or select the field and enter the new value or use the End marker. If you change the value in the Max field, then the End field is set to that new value. If you are working with a saved program, then the Max and End fields are set to the values that were saved. |
Current | Displays the current frame number. |
Increment | By default, set to 1. To change the increment, use the stepper controls or select the field and enter the new value. |
Next | By default, set to the value in the Start field, in a new program. You can set the Next field to any value between the Start and End values: the Sequencer will begin running at that value. (When the Sequencer is in loop mode, subsequent loops begin at the value in the Start field.) |
Min and Max | Specify the allowed range of sequence values. These are text fields that can be altered. Data Explorer ensures that the value in the Start field is greater than or equal to the Min value, and the value in the End field is less than or equal to the Max value. |
| Note: | If the images change more quickly than you would like, use the Throttle... option (see "Changing the Rate of Frame Display: Throttle..."). |
The Sequencer can be data driven, meaning that its minimum, maximum, and step values can be set by connecting the output of a tool to the input of a Sequencer in the VPE or by a value typed into the Sequencer's Configuration dialog box, rather than by using the Frame Control panel.
If the Sequencer is data driven, then the information transmitted by connection or set in the Configuration dialog box overrides values set in the Frame Control panel.
A data-driven Sequencer allows you to create visual programs that will work with a variety of input data sets without your having to reset Sequencer attributes. For example, if the Sequencer minimum is set to zero and its maximum to the number of steps in a series, it can be used to drive the Select module to select each member of the series in turn.
The inputs are summarized in the corresponding module description in IBM Visualization Data Explorer User's Reference.
Each time an input to a data-driven Sequencer is changed (for example, by importing a new data set) the Sequencer is reexecuted, updating its attributes.
If Data Explorer encounters an error in your visual program while executing it, an error message is displayed in the Message window (see 8.2 , "Using the Message Window"). The name of the tool in which the error occurred is shown in the window. Pull-down menu options enable you to quickly locate the tool that caused the error.
The title of the tool icon in the visual program that caused the error is displayed in a different color in the VPE until you execute the program again. When the error occurs, execution stops only in the path where the error is; other paths continue.
![]()
![]()
![]()
![]()
[ OpenDX Home at IBM | OpenDX.org ]